Disclosure: This site may contain affiliate links. If you make a purchase through these links, I may receive a commission at no additional cost to you. However, all opinions are my own.
Python is a powerful and versatile programming language that is used to develop programs for various purposes. It is quite popular among both beginners and experienced developers. Python is used in three main areas: website development, machine learning and process automation. This language is cross-platform, which allows you to run it on different operating systems.
Who to read this article for:
- Students of Python courses: Often, training courses do not cover the aspects of deploying applications in production. This article will help you understand how to run your programs on real servers.
- Customers of Python programs: If you are facing the problem of running an application ordered from a programmer and have not received clear instructions, this article will help you understand the basic steps of deploymen
Who should not read this article:
- DevOps engineers: If you know what Docker and serverless solutions are, this article won’t provide you with new information.
Options for deploying Python applications
Setting up an environment to develop and run Python web applications can be a daunting task, especially if you have limited experience in server management. Let’s take a look at the main types of hosting options:
- Clean VPS. Setting up a pure VPS manually provides maximum control and flexibility. It requires quite a bit of knowledge and experience in server administration, but allows you to fully customize the server to your needs. Below, in this article, we will look at a complete example of running a Python Flask web application on a VPS.
- Shared Virtual Hosting. Control panels such as WHM/Cpanel and ISP Manager support running Python programs. However, with shared hosting, you often need to write to tech support to enable Python support and set up SSH access. This option can be complicated and requires frequent interaction with the hosting provider’s technical support.
- VPS with control panel. Virtual Private Servers (VPS) with control panels (e.g. WHM/Cpanel, ISP Manager) installed can be more convenient for running Python applications. They provide more control and options for customizing the environment. If you need a panel to run not only a python application, but also other PHP sites at the same time, you should consider this option.
- Serverless solutions offered by cloud providers (Azure, GCE, AWS) allow you to run applications without having to manage servers. This can be a cost-effective option for small workloads, but the cost can increase significantly as the workload increases.
- GitOps application engines. A number of cloud platforms (Azure, GCE, AWS, Digital Ocean) offer the ability to deploy applications directly from Git repositories. This simplifies the deployment process and allows for integrated CI/CD processes.
Choosing Python hosting
When choosing hosting for Telegram bots, scripts and Python applications on Flask or Django, the most suitable option is to use a virtual private server (VPS/VDS). VPS provides a high level of control over the server and allows you to flexibly customize the environment for your application. For testing and small projects, any cheap VPS will do. This will allow you to deploy your application, debug it and make sure it works correctly.
As your project grows and the load increases, you can upgrade to more powerful VPS plans. This will allow you to scale resources (CPU, RAM, disk space) according to the needs of your application, ensuring stable and efficient operation. Using a VPS provides flexibility and smooth scalability, making it the best choice for deploying Python applications on Flask and Django.
For initial projects, you can order cheap hosting (VPS) for Python from such hosting providers :
- THE.Hosting: Aluminium tariff (1 vCPU / 1 Gb RAM / 25 Gb NVMe). Price 1 € per month.
- Friendhosting: Micro NVMe tariff (1 vCPU / 512 mb RAM / 10 Gb NVMe). Price 3.49 € per month.
If your project becomes more complex and requires high performance, it is recommended to upgrade to VPS plans with improved features and support. You can learn more about choosing the right VPS/VDS-tariff on our VPS selection page or use our DIEG Finder VPS/VDS selection service.
Example of running a Python Flask application on VPS
In the initial section, we’ll look at how to configure a Linux environment to run Python and add support for Flask. If I have to configure the server from Windows, I use the SSH client MobaXterm, because it additionally establishes an SFTP connection, which allows me to copy files to a remote server. If the project is large, use FileZilla (in SFTP mode) to copy project files.
Step 1: How the web stack works for Python applications
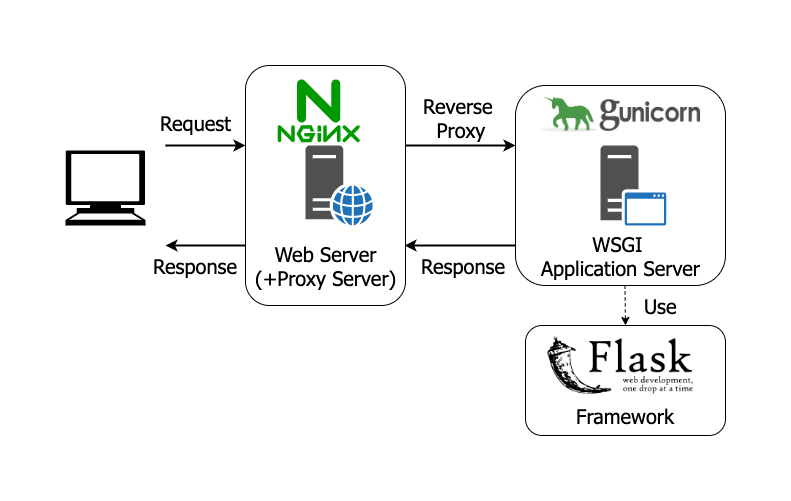
Gunicorn is a lightweight web server designed to run and create multiple workflows (workers) for our Python application. It is preceded by Nginx, which serves static files (css, js, png, etc.) directly, and redirects requests for dynamic content to Gunicorn. Gunicorn passes requests to our application through the WSGI standard.
- Nginx: Receives an HTTP request from the client and passes it to Gunicorn.
- Gunicorn: Receives the request from Nginx and uses WSGI to pass it to the Python application.
- WSGI: The interface through which Gunicorn communicates with the Python application by passing the request to it.
- Python: Processes the request, interacts with the business logic, and returns a response via WSGI.
- Gunicorn: Receives the response from the Python application and passes it back to Nginx.
- Nginx: Sends the final response to the client.
Step 2: How to configure your Linux environment to work with Python
So, we received root access to a clean VPS from the hoster. Usually there is nothing on a VPS other than the SSH daemon. We log into the server via SSH, update the operating system and, if necessary, reboot the VPS:
apt update
apt full-upgrade
reboot
Check if pip is installed or not:
pip --version
pip 24.0 from /usr/local/lib/python3.10/dist-packages/pip (python 3.10)
As you can see, I have pip already installed, if not – you need to run the command below. And let’s install the dependencies we need for future customization and launching of Flask:
apt install python3-venv python3-pip python3-dev build-essential libssl-dev libffi-dev python3-setuptoolsEven if you have just installed Python, some packages will be on the system by default. Check which packages are installed in python:
pip list
...
[notice] A new release of pip is available: 23.3.1 -> 24.0
[notice] To update, run: python3 -m pip install --upgrade pip
As you can see in the listing above, I am offered to update pip, let’s update it using the recommended command:
python3 -m pip install --upgrade pipStep 3: Create User
We need to create a user to run our python application from. Let’s set it as bash shell (it’s more convenient for me) and set a password:
adduser  --shell /bin/bash diegdev

Adding user `diegdev' ...
Adding new group `diegdev' (1004) ...
Adding new user `diegdev' (1004) with group `diegdev' ...
Creating home directory `/home/diegdev' ...
Copying files from `/etc/skel' ...
New password:
Is the information correct? [Y/n] y
Add the user to the sudo group so that they can get root privileges:
usermod -aG sudo diegdevYou are now using root superuser rights. If you need to switch to the new user diegdev and go directly to his home directory, use the su command. It is possible without the hyphen, but then you will additionally have to type the cd command to get to your home folder.
su - diegdev
Step 4: What is the Python Virtual Environment
To run Python scripts or web applications (Flask, Django), it is always recommended to use a virtual environment. These can be created in a number of ways, such as using: venv, pyenv, virtualenv, anaconda.
We will use the venv module, which supports the creation of lightweight “virtual environments”, each with its own independent set of Python packages installed in your site’s directory. A virtual environment is created on top of an existing Python installation, known as a “base” Python installation, and can be isolated from the packages in the base environment if desired. Therefore, only those packages explicitly installed in the virtual environment are available to your application. When used from a virtual environment, conventional installation tools such as pip will install Python packages into the virtual environment without the need to explicitly state this.
The venv module, we have installed above as a dependency, if you have not done so, run the installation:
apt install python3-venvStep 5: Upload Python application to the hosting
Up to this stage, we have done all the settings under the root user. But now you can give the programmer of your project SSH access from the diegdev user and let him upload the project files.
There are three main ways to upload the project to the server:
- uploading via file transfer protocols (FTP, FTPS, SFTP);
- using git repository;
- project deployment using tools embedded in the IDE you are working with.
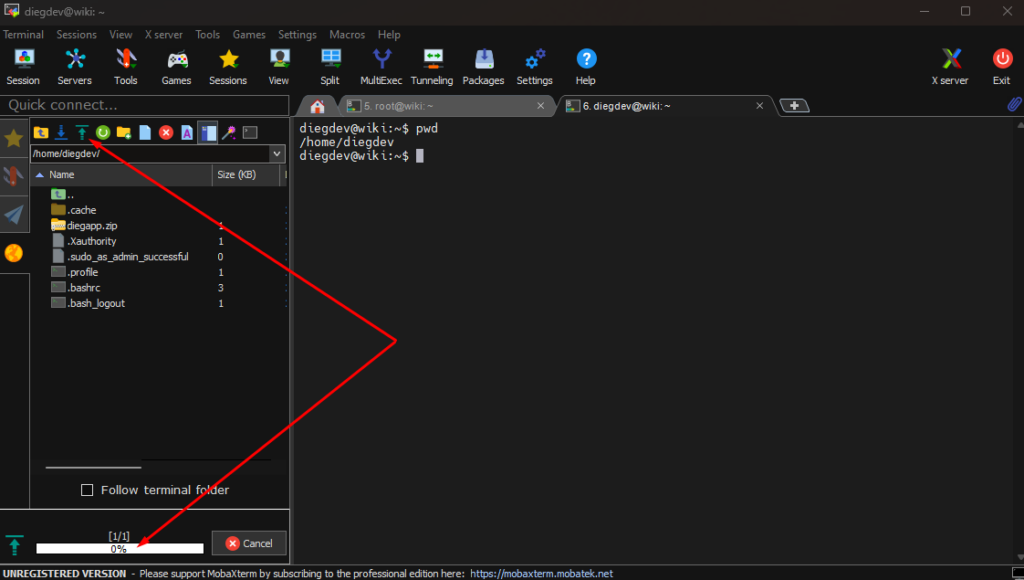
I will use the SSH client MobaXterm to upload files, you can use for example FileZilla (in SFTP connection mode). In the screenshot I have shown how to upload the application archive to the server under the user diegdev using MobaXterm.
My project contains 2 files, rights belong to the user diegdev and is located in the directory /home/diegdev/diegapp:
ls -l /home/diegdev/diegapp

-rw-rw-r-- 1 diegdev diegdev 193 Jun 16 18:25 myapp.py
-rw-rw-r-- 1 diegdev diegdev 109 Jun 13 15:46 requirements.txt
Step 6: Configuring the virtual environment
We have installed the venv module above and I have explained what it is for.
Next, under the diegdev user go to the previously created project directory and create a virtual environment for the project.
/home/diegdev/diegapp
python3 -m venv diegappenv
Activate the environment using the source utility. As you can see, the bash prompt has changed, adding the name of the Python virtual environment created above in parentheses.
diegdev@wiki:~/diegapp$ source diegappenv/bin/activate
(diegappenv) diegdev@wiki:~/diegapp$
To exit this mode use the deactivate command, after entering this command any Python commands will use the Python system environment again. Don’t forget that our application should be run only from the virtual environment.
deactivate
Step 7: Install dependency packages from requirements.txt
When the project is ready, the programmer should have created a list of dependencies for your project and put it in the requirements.txt file. If he doesn’t know how to create a requirements.txt file (I’ve had this happen in my practice), send him a link to this article.
Use the Freeze module to create requirements.txt. In the command below, specify the correct path to save the file. The requirements.txt file now contains a list of all installed packages and their versions that your project uses.
python -m pip freeze > projects/your_project/requirements.txt
Let’s run the command to install dependencies from the requirements.txt file:
pip install -r requirements.txt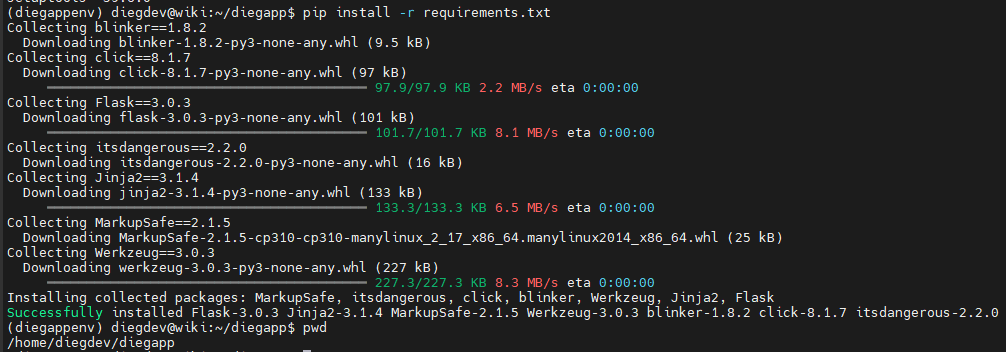
To check which packages are installed, run the command:
(diegappenv) diegdev@wiki:~/diegapp$ python -m pip list
Package      Version
------------ -------
blinker      1.8.2
click        8.1.7
Flask        3.0.3
itsdangerous 2.2.0
Jinja2       3.1.4
MarkupSafe   2.1.5
pip          22.0.2
setuptools   59.6.0
Werkzeug     3.0.3
Step 8: Install Gunicorn and Flask packages
Gunicorn can be installed in the operating system, but I highly recommend installing via pip in a virtualized environment. Next, install Gunicorn and Flask:
(diegappenv) diegdev@wiki:~/diegapp$ pip install gunicorn flaskStep 9: Create WSGI entry point
The contents of the myapp.py file:
from flask import Flask
app = Flask(__name__)

@app.route("/")
def hello():
    return "<h1 style='color:green'>Hosting Consultant</h1>Leave a review on the site <a href='https://dieg.info' target='_blank'>dieg.info</a>, it will help others!</li>"

if __name__ == "__main__":
    app.run(host='0.0.0.0')
Let’s say the main file of your application is called myapp.py and you are in the same directory. Let’s test its operation directly without Gunicorn.
(diegappenv) diegdev@wiki:~/diegapp$ python myapp.pyIf there are no errors and you can open your application in a browser let’s create a file wsgi.py in the root of the diegapp directory, which will act as an entry point for our flask application. It is needed for the Gunicorn server to communicate with the application. My wsgi.py contains code like this:
from myapp import app

if __name__ == "__main__":
    app.run()
Let’s check that Gunicorn can work properly in conjunction with the application. To do this, run the command:
(diegappenv) diegdev@wiki:~/diegapp$ gunicorn --bind 0.0.0.0:7777 wsgi:appAs a result we should get the following messages, and in the browser when you go to your ip and port 7777 you will see your working site on Flask.
(diegappenv) diegdev@wiki:~/diegapp$ gunicorn --workers 3 --bind 0.0.0.0:7777 wsgi:app
[2024-06-16 21:40:01 +0300] [11395] [INFO] Starting gunicorn 22.0.0
[2024-06-16 21:40:01 +0300] [11395] [INFO] Listening at: http://0.0.0.0:7777 (11395)
[2024-06-16 21:40:01 +0300] [11395] [INFO] Using worker: sync
[2024-06-16 21:40:01 +0300] [11396] [INFO] Booting worker with pid: 11396
If everything works, then press CTRL+C in the terminal window to stop gunicorn. Then proceed to the next step.
Below is some additional information on launching the Gunicorn web server. Launch keys:
- The -w or –workers switch means the number of workers. Gunicorn is a serious web server designed for heavy loads. It is able to process multiple requests simultaneously thanks to its architecture. Gunicorn has a main process that manages a set of worker processes. The main process only distributes requests from site clients, and workers process them. One worker is not enough to accelerate Gunicorn to its maximum. This is all due to the fact that the worker is interfered with by I/O operations, causing Python to fall asleep and wait for a response. If there are few workers, the server does not work at full capacity, and if there are too many, it slows down. The number of workers depends on the processor cores and you can see their number using the nproc utility. The Gunicorn documentation advises following the following formula: N workers = Number of cores x 2 + 1. That is, for a VPS with two cores we get 5 workers. If the processor has 1 core, then according to the formula we get 3 workers.
- The -b or –bind switch binds Gunicorn to a specific IP address of your VPS and port. You can also run the web server locally at the address 127.0.0.1, or on all network interfaces at once through 0.0.0.0.
- 7777 is the port number on which your application is running. Accordingly, you must specify it explicitly in the browser, for example, if your IP on the VPS is 10.10.10.10.10, then in the browser you need to enter http://10.10.10.10:7777.
- wsgi is the name of your script without .py, and app is the name of the function. This will tell Gunicorn where to look for the function that will process the browser request.
To run gunicorn, you can also use the variant with sock, this saves VPS resources by not taking up ports. But this is up to your discretion, in this guide use ip and port. The startup string with sock will look like this:
gunicorn --workers 3 --bind unix:diegapp.sock -m 007 wsgi:appUse the curl utility to verify that your application is working correctly:curl --unix-socket /home/diegdev/diegapp.sock localhost
Step 10: Configuring Gunicorn to start automatically
Setting up Gunicorn to start automatically via systemd is beyond the scope of this article. We use the power of the Gunicorn server itself to run in the background.
Let’s launch it as a daemon using the D key. We’ll also indicate there that your application processes requests only to the localhost (port 7777) – this will prevent attackers from gaining access to our server.
gunicorn -D --workers 3 --bind 127.0.0.1:7777 wsgi:appNothing should appear on the command line, unlike a normal startup. To make sure gunicorn is up and running use the ps utility and you will see 4 running processes:
ps -ef | grep gunicorn
...
diegdev    11570   11569  0 21:55 ?        00:00:00 /home/diegdev/diegapp/diegappenv/bin/python3 /home/diegdev/diegapp/diegappenv/bin/gunicorn -D --workers 3 --bind 127.0.0.1:7777 wsgi:app
...
Step 11: Configuring the nginx proxy for the Flask application
Install Nginx:
sudo apt install nginxNext, configure the virtual domain, in our example dieg.dev.
sudo nano /etc/nginx/sites-available/dieg.dev.confThe dieg.dev.conf file should minimally contain these lines:
server {
    listen 80;
    server_name dieg.dev;

    location / {
        include proxy_params;
        proxy_pass http://127.0.0.1:7777;
    }
}
Next, include our domain in Nginx by creating a symbolic link to the file. Check for errors and restart Nginx.
sudo ln -s /etc/nginx/sites-available/dieg.dev.conf /etc/nginx/sites-enabled
sudo nginx -t
sudo systemctl restart nginx
Done! Now your application is available to the whole world.
To meet security standards, it is advisable to install a free SSL certificate. Installing Let’s Encrypt SSL is beyond the scope of this article, but should not cause you any difficulties. You need to install the certbot program. I will summarize the commands for our example with the dieg.dev domain:
sudo apt install python3-certbot-nginx
sudo certbot --nginx -d dieg.dev
Answer the questions of the last command. As a result, the virtual domain settings in Nginx will be changed, Nginx will be automatically reloaded and you will see the secure connection icon in your browser.
Conclusion
You should understand that deploying Python applications requires deeper knowledge from the developer than, for example, PHP hosting with a WordPress site. Not every technical support of the hosting provider you choose will undertake to run your Python application, much less optimize its performance. In the context of the above example, the minimum that needs to be done is to configure Nginx to serve static files, install an SSL certificate and determine the optimal number of workers for Nginx and Gunicorn depending on the characteristics of your VPS/VDS. To successfully deploy and run your Python applications, consider using proven VPS/VDS hosting providers.
Pricing for Python Hosting: If you Google the common question about the cost of hosting a Telegram bot in Python that consumes 300 MB of RAM, you will not find a specific answer on the Internet. I hope my article has given you a hint as to why there is no such answer.