Disclosure: This site may contain affiliate links. If you make a purchase through these links, I may receive a commission at no additional cost to you. However, all opinions are my own.
First you need to check on the website of the hosting provider that you choose, whether the domain name is free or not. Let’s look at an example of web hosting provider TimeWeb (Таймвеб).
Step 1 – Checking domain availability
To do this, go to the main page of the site TimeWeb, where at the bottom of the page we can check our domain name by clicking on “Verify Domain”. In the window that opens, insert the name of our future site and click on “Verify”. After a while we get the result. For example, the domain is already busy, but you can register the same in other zones (say, org or com). Here are all the domains in which you can register on this hosting, as well as the cost of registration of these domains.

We can check our domain name without registering for this hosting service and see the plans. Here are the characteristics of tariff plans (price per month, year, ways to save), what is included in each of them. We can see what payment methods are available (WebMoney, terminals, receipts, plastic cards, cashless payment).
Step 2 – Hosting registration
In order to register for this hosting, click on “Заказать услуги”. We get to the page to order services. Open the tab “Виртуальный хостинг” and choose a hosting plan by clicking on the appropriate link. We are offered five service plans to choose from. It is best to order the plan “Optimo +”, which best matches the price and quality. The cost per month is 212 rubles, for the year – 2148 rubles (saving 1080 rubles), as well as a domain name for free. If you choose to pay monthly, you’ll pay 2,148 rubles for the year. You choose how to pay (at once or monthly).
If you have chosen a tariff plan, then click “Заказать”. Then fill out the order form. The default tariff plan is “Optimo+”.
In the “Тип клиента” field leave “Физическое лицо”. Next, fill in your account information (login for your account on this hosting, a valid e-mail address). These fields are required. Here you enter only the real data.
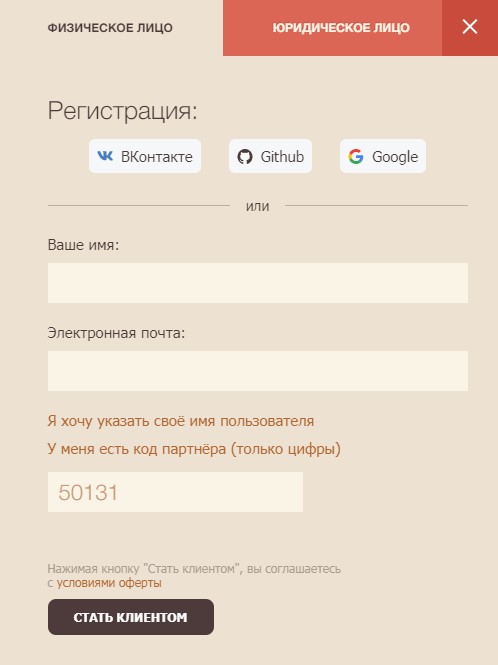
The field “У меня есть код партнёра (только цифры)” is not required to fill in, but if you need free advice on choosing and setting up your hosting, enter the numeric code 50131 and email me.
After all this you can read the offer agreement and press the “Стать клиентом” button to complete registration.
The next page will say that registration is complete. Within a few minutes, your hosting account will be opened (based on the data you entered), and an email from TimeWeb service will be sent to your mailbox. This letter will contain your account name, password, and a link to the control panel. Remember (or copy) the credentials and log in.
Step 3 – Hosting Control Panel: Payment for Hosting Services
You find yourself inside your office. Here on the left you can see your data, which you entered when you registered. For ten days there will be testing, and the account will work. Then access to it will be closed. As long as web hosting is not paid for, it can not work one hundred percent. So now we are interested in refilling the account.
If you want to use a promo code, you must apply it before you pay for the service. Under “Бонусы и промокоды”, you must enter the promo code and click on “Активировать”. Then pay for the services. Go to the Discounts, Coupons & Promo Codes for Hosting page and select the promo code you want.
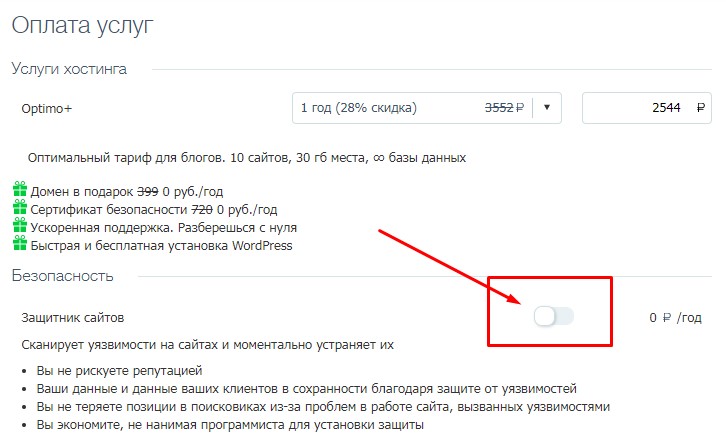
Open the tab “Оплата услуг” to select the method of payment. Select the period for payment, I recommend 1 year, but you can pay any amount. Important: uncheck “Защитник сайтов”, this service is often unnecessary, especially if it is your first site.
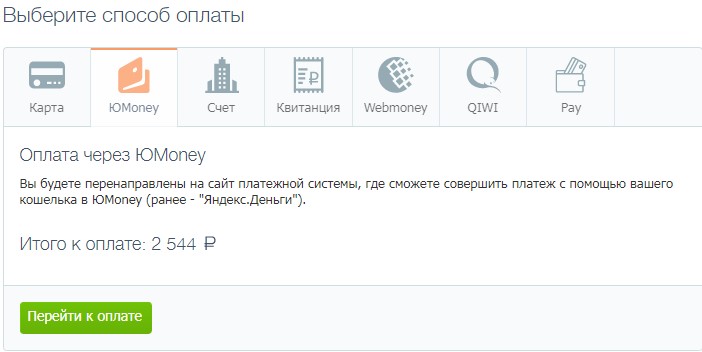
You can write a receipt through the bank card, Webmoney or other options. For example, we click on the link “ЮMoney”, then click “Перейти к оплате”, and immediately the window of the payment system appears.
You need to check if pop-ups are blocked. If so, your browser command line will say so. You will be prompted to unblock the pop-ups, and you click “Unblock”. The TimeWeb pop-ups then become available, and the window of the selected payment system appears.
In order to pay for services, you need to log in, that is, enter your username and password. You get a page of ЮMoney, which already says how much you pay. You only need to enter the payment password and press the button “Подтвердить”. Then follow all the steps according to the instructions, carry out the payment to the end.
Step 4 – Hosting Control Panel: Buying a Domain
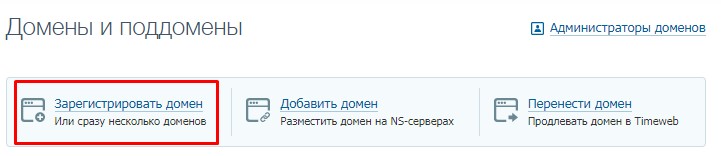
Now you need to go back to the control panel to pay for the domain. Select the item “Домены и поддомены”, then “Зарегистрировать домен”, enter the name you want to assign your domain. Then click on “Проверить домен”. If the domain will be free, then leave it. If it is busy, you can choose another name. The domain name can contain your data (first and last name), reflect the subject of your site.
If the domain is free, there will be a green checkmark and a “Оплатить” button. In the window that opens, click on the button “Перейти к оплате”. By default, the purpose of payment and the cost is already set.
After you have chosen a domain name, you also need to have an administrator – the owner of the domain. Click “Создать администратора” and select “Физическое лицо”. Fill out your credentials carefully and accurately, because the domain is your property. To have the right to this property, you need to fill out the document correctly. Here everything is filled in Russian letters. Filling out this form – this is the creation of a document on the ownership of your domain.
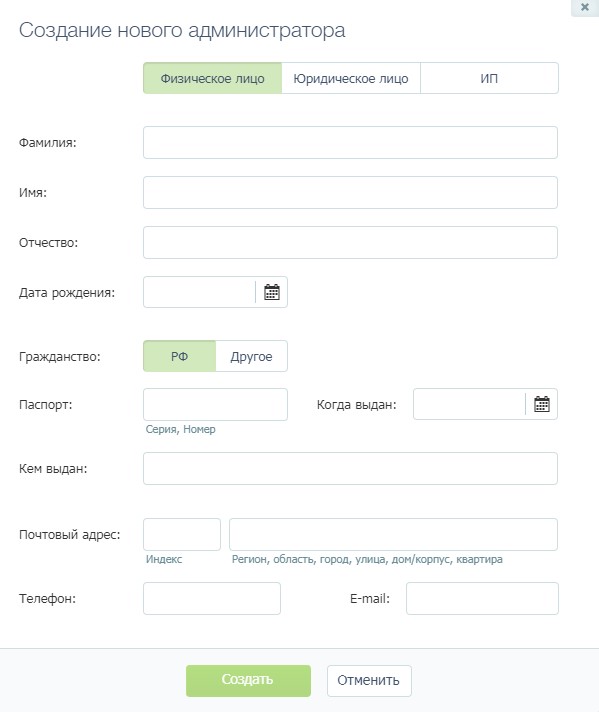
Then you press the “Создать” button. If everything is filled out correctly, there is a short pause, during which the server thinks. Then the entry “Администратор” appears. This means that you can proceed to the payment of the domain. Everything is repeated again, that is, you choose through a system method of payment. Automatically appears the amount and purpose of payment. Press the “Оплатить” button, all repeated in the same order as we paid for web hosting.
If you choose another method of payment (for example, through a bank), you will be prompted to write your last name and residence registration, and write a receipt for payment through the bank. You can view the payment in the control panel (in the menu “Текущий баланс”) or in the section “Движения по счету”, where you can see all your payments.
Conclusion
Congratulations! At this stage you have purchased hosting and domain, the only thing left is to install the engine for the site, such as WordPress (pay attention to the article WordPress Security Guide – Step by Step).


Thank you.
I’m not sure exactly why but this website is loading
very slow for me. Is anyone else having this issue or is
it a problem on my end? I’ll check back later and
see if the problem still exists.
This was an incredibly wonderful post. Thank you for providing these details.
Neat blog!
Is your theme custom made or did you download it from somewhere?
A theme like yours with a few simple adjustements would really make my
blog jump
out. Please let me know where you got your design.
With thanks
This is a customized theme Storefront.
I start business in Russia. And I need russian hosting. Thank you help in choosing a hosting.
I moved to timeweb and forgot all my hosting problems. Before that, I had had a lot of trouble with European webhosting and a little with Russian ones. But here I have properly configured servers and a handy panel. I recommend it.
This company has a lot to choose from. This company has the fastest servers I have seen in Russia. They are easy to use and very friendly. They handle all my needs well, and I would say they are one of the best in Russia. If you need any hosting, give them a try.